My Salisbury Steak Recipe

Okay, so I usually don’t post regular old recipes but this one went over really well. When my wife can’t stop eating it, I know it’s good lol. Anyway, this is my recipe. This was all an experiment today.

Ingredients:

  • 1 large onion (chopped)
  • 1-2 large green peppers
  • 1.5 – 2.0 lbs hamburger
  • 1/2 teaspoon black pepper
  • 1 teaspoon salt
  • 2 eggs
  • 2 tablespoons Worcestershire sauce
  • 1/2 cup water
  • 1 cup bread crumbs
  • 2 packets of french onion soup mix
  • 3 cups beef gravy (I just edit the canned stuff from Krogers)
  • 1/2 cup ketchup
  • 1 tablespoon mustard

Steps:

  1. Chop your green peppers and large onions and then place them in a large bowl.
  2. Mix the bread crumbs, hamburger, french onion soup mix, salt and pepper together.
  3. Place the mixture in the fridge and let it sit for an hour or two. You don’t have to do this, but the flavors will blend better into the meal if you give it this time.
  4. When you are ready to continue, set your oven to 350 degrees F.
  5. Crack the two eggs and add them to the meat mixture.
  6. Start creating meat patties and place them in an oven safe pan.
  7. Once all the patties are made, place the ketchup, mustard, water, Worcestershire sauce and gravy into a bowl and mix it together. Make more of this gravy if you want it to have more in the meal, or if you want to place some on the side when dinner is done.
  8. Take this new gravy mixture and pour it over the meal in the pan. Coat all of the patties as much as possible.
  9. Place the pan in the oven and cook for about 45 minutes. Dinner is done.
  10. I did make home made mashed potatoes with this meal as it just seemed to make the best sense.

No Administrator Account for Moodle

It is possible to lose an administrator account on your site, especially when importing users from another system.  I’ve seen this happen a few times and here is a quick remedy.

  1. Log into your database software tool, such as phpmyadmin.
  2. Look in your users table (i.e. moodle_user) and find the user account that should be an administrator, and get the id number of the account that you want to be an administrator.

  1. In moodle, modify your config.php file by adding the following line. Change the ID number to the number of your users and upload it to the system.

$CFG->siteadmins=’2,20002′;

That’s it.  Next time you log in with that account you should be an administrator again and you should have access to the Administrator block.


Pineapple Jelly Recipe

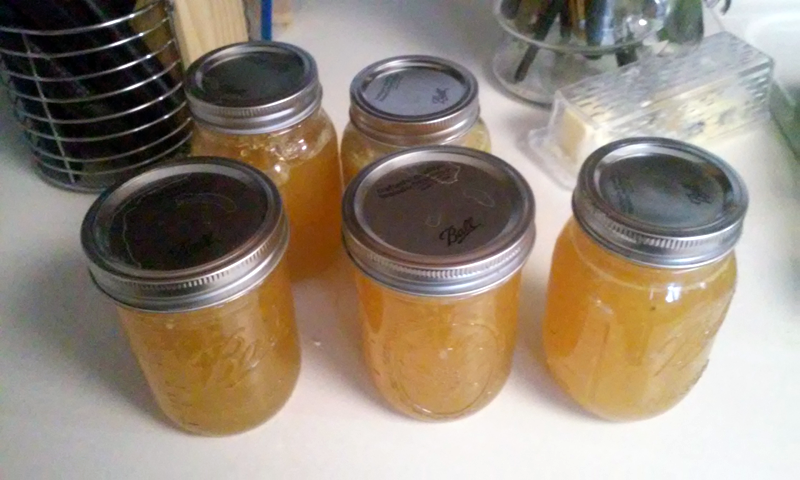
This is what pineapple jelly should look like

This stuff is yummy!  Not for a diabetic, that is fore sure, as it is sweet and sugary.  Anyway, this is built off of another recipe that I had.  This recipe makes about 2-2.5 pints of jelly.  I prefer making jelly in pints because that is how we use them in our house, though you may find that you want to use the small jelly jars.  Also, I used to do this as doubling it to get this done faster and making more, but I no longer do this.  It seems when you mix 2-3 batches together simultaneously, that it is highly likely you will burn your pots, even stirring it all the time.  When sugar boils it is EXTREMELY hot and flammable.

Ingredients:

  • 1 large pineapple (about 2.5 cups if you are using a canned pineapple)
  • 3 tablespoons lemon juice
  • 3.5 cups of sugar
  • 1-1.5 packet of liquid pectin, or 1/5-2/5 cup of regular pectin
  1. Start heating the water in your water bath canner.
  2. Cut up your pineapple, or open the can, and blend the pineapples in a food processor or blender.  I’ve done batches with blending and one’s without, and I prefer the blended version, as it will be very chunking without blending it first.  You can also just cut them up if you want it a bit more chunky.
  3. Mix the pectin with about 1/4 cup of sugar in a bowl.  Leave the rest of the sugar off to the side.  Use 1 packet of pectin if you want it to be a more runny mix, or mix 1.5 packets to make it a more stiff jelly.  I prefer the more running version just because it’s easier to spread.  1.5 packets will make it around the consistency of what you get in a store or a little thicker.  Regular pectin can be used as well, using 1/5 cup for a running version and 2/5 cups for a thick batch.
  4. Mix this with your cut up pineapples in your pan and bring it to a full boil.
  5. Once it gets to a full boil, start pouring the rest of the sugar in.  I usually add 1 cup more at a time and mix it, then pour the next one until I’m done.  Again, sugar burns pans so I figure if I insert it a bit slower, maybe I will have less problems burning things lol.
  6. Mix the lemon juice into the mixture.
  7. Bring this mixture to a full boil.  Once it hits a full rolling boil, boil it for about 1 more minute.  Make sure to stir the mixture while doing this as it can overflow when it foams up and burn your pots at this point.  If this goes over your pan, you could also cause a fire as liquid sugar is flammable, so don’t leave it at this point.  Also, remove any froth at the top of mixture as it is boiling.  It usually floats to the top middle of the pot as your are boiling it and if you don’t remove it, you will get what you see in the picture below (1 of my bad batches, though it still tastes great).

  1. Remove the mixture burners and you are ready to start canning.  Turn off the stove.
  2. Start pouring the jelly into your jars.  Note, these jars should all be hot to start as you should have just washed them, and your lids should also be clean and hot already.  Do not do this without using hot jars as your jars could crack when placed into the water bath canner otherwise.
  3. Place your rings and lids on your cans and hand tighten them.
  4. Once done, wait until the water is boiling in the water bath canner, then place your jars into the canner and place the water bath canner lid on.
  5. Let the jars boil for 10 minutes in the canner, or 15 minutes if you are about 6,000 feet elevation, then remove the cans, and you are done.
  6. If you want to make another batch, this is a great time to clean that pot and start another batch.  When I make multiple batches I’m usually cutting up the next batch of pineapples and cooking the next batch while the previous batch is being canned.  It keeps you busy while waiting.

Ghost Pepper Salsa (Revised)

Okay, so I decided I wanted one that was a bit hotter.  This one has a lot more kick then the first recipe.  This is based off of my last Ghost Pepper Salsa recipe, but this one has a lot more kick.  I picked most of these ingredients or changes based on what we had grown last year in the garden.


Ingredients:

  • 8 lbs fresh Tomotoes
  • 1/2 cups chopped Thai Peppers (seeds and all)
  • 1 cup chopped Bell Peppers
  • 1/2 cup seeded and chopped fresh Jalapeno Peppers
  • 3 Ghost Peppers, chopped, seeds and all
  • 2 Carolina Reapers, chopped, seeds and all
  • 2 Banana Peppers, chopped, seeds and all
  • 2 cops chopped Onions
  • 1/2 cup fresh squeezed Lemon Juice (I didn’t have lime juice here or I would have used that, didn’t seem to make too much of a difference)
  • 1/2 cup White Vinegar
  • 6 ounces Tomato Paste
  • 6 or 8 cloves Garlic, minced
  • 1 teaspoon ground Cumin
  • 1/2 tablespoon ground Black Pepper
  • 3 teaspoons salt

The major change here is dropping the Anaheim peppers for the Thai Peppers.  There are much less Thai Peppers, but Thai’s are about 15 times hotter than an Anaheim.  With that, there’s a bit more Bell Pepper, a few other peppers, including the banana peppers for taste, a little more garlic, and 1 more ghost pepper.

Wash your tomatoes and remove the stems with a knife.

Fill a large pot with four or five inches of water and bring to a boil.  With a slotted spoon place a few tomatoes at a time into the boiling water for about a minute, or until the skins start to crack and peel.  The tomatoes should be completely submerged.  Immediately put the tomatoes into a cold ice water bath to stop the cooking and then drain in a colander.  The skin should slip off easily.  (Note, instead of doing this, you could also just freeze the tomatoes, then place them in water (doesn’t need to be hot) and peel the skins off (I find this much easier).

Cut the skinned tomatoes in half then quarter each of the halves.  Place a large colander in the sink and put the chopped tomatoes in it to drain off most of the juice.

When drained, place the tomatoes back into the large pot, dumping the water out first.  Bring to a boil, then reduce heat and simmer uncovered for about 1.5 hours.  Stir it often to prevent burning.

During that 1.5 hours, get all of the rest of the ingredients chopped up and placed in a bowl.  After the tomatoes are ready, add the remaining ingredients and bring it back up to a boil, then reduce heat and simmer uncovered for 10 minutes.

Spoon the warm ghost pepper salsa into warmed, sterilized canning jars, leaving a 1/2 inch of headspace.  Wipe jar rims with a damp towel, place lids on the jars, and tighten by hand.

Place the filled jars in a water bath and bring it up to a boil.  Leave them in the boiling bath for 15 minutes, then remove jars and place them on cooling racks.  Any jar that fails to seal properly can be placed in the refrigerator and used fresh.

Note: You can use canned tomatoes that have already been peeled if this seems like too much work.  However, you can’t beat the taste of fresh Ghost Pepper Salsa.


Ghost Pepper Salsa Recipe

This is a copy from another site (The Farm Garden Blog) which has since went down.  This is a pretty good recipe that has a little bit of heat.  I’ve made a few batches of this stuff and it’s pretty good.

Ingredients:

  • 8 lbs fresh Tomotoes
  • 1 1/2 cups chopped fresh Anaheim Chili Peppers (seeds and all)
  • 1/2 cup chopped Bell Peppers
  • 1/2 cup seeded and chopped fresh Jalapeno Peppers
  • 2 Ghost Peppers, chopped, seeds and all
  • 2 cops chopped Onions
  • 1/2 cup chopped Cilantro
  • 1/2 cup fresh squeezed Lime Juice
  • 1/2 cup White Vinegar
  • 6 ounces Tomato Paste
  • 5 or 6 cloves Garlic, minced
  • 1 teaspoon ground Cumin
  • 1/2 tablespoon ground Black Pepper
  • 3 teaspoons salt

Wash your tomatoes and remove the stems with a knife.

Fill a large pot with four or five inches of water and bring to a boil.  With a slotted spoon place a few tomatoes at a time into the boiling water for about a minute, or until the skins start to crack and peel.  The tomatoes should be completely submerged.  Immediately put the tomatoes into a cold ice water bath to stop the cooking and then drain in a colander.  The skin should slip off easily.  (Note, instead of doing this, you could also just freeze the tomatoes, then place them in water (doesn’t need to be hot) and peel the skins off (I find this much easier).

Cut the skinned tomatoes in half then quarter each of the halves.  Place a large colander in the sink and put the chopped tomatoes in it to drain off most of the juice.

When drained, place the tomatoes back into the large pot, dumping the water out first.  Bring to a boil, then reduce heat and simmer uncovered for about 1.5 hours.  Stir it often to prevent burning.

During that 1.5 hours, get all of the rest of the ingredients chopped up and placed in a bowl.  After the tomatoes are ready, add the remaining ingredients and bring it back up to a boil, then reduce heat and simmer uncovered for 10 minutes.

Spoon the warm ghost pepper salsa into warmed, sterilized canning jars, leaving a 1/2 inch of headspace.  Wipe jar rims with a damp towel, place lids on the jars, and tighten by hand.

Place the filled jars in a water bath and bring it up to a boil.  Leave them in the boiling bath for 15 minutes, then remove jars and place them on cooling racks.  Any jar that fails to seal properly can be placed in the refrigerator and used fresh.

Note: You can use canned tomatoes that have already been peeled if this seems like too much work.  However, you can’t beat the taste of fresh Ghost Pepper Salsa.